When installing the SOLIDWORKS Toolbox, the first question you’ll need to answer is: “Should I install it on the local machine, or on the server?”, and your decision will ultimately be based on whether you are working in a multi user environment or not.
If you’re working in a multi user environment, we’d recommend installing The SOLIDWORKS Toolbox on the server. The toolbox can be customised; part numbers, descriptions and materials can be applied to the individual fixings within the toolbox. So it makes sense that all users are working from the same toolbox so they can use those customisations. It doesn’t matter too much for single users, but if it’s on a server location your I.T. administrator can create a backup.
Installing on a server
The toolbox is installed automatically when installing SOLIDWORKS professional or above. The default location it installs to is C:\SOLIDWORKS Data, but this can be changed during the install or alternatively you can move the entire SOLIDWORKS Data folder to the server after the install. In fact, we’d recommend moving the folder after because there are likely to be less issues with permissions and the install will be quicker because you are writing to the local machine
Once the SOLIDWORKS Data folder has been moved it will be necessary to point all client installations to the server toolbox. To do this simply go in tools->options->system options->Hole Wizard/Toolbox and change the path to the server location as shown in the image.

It is very important once all the clients are pointing to the server toolbox that any traces of the local SOLIDWORKS Data folder are removed from the local machines. If this has not been done it can lead to problems later on – Particularly when receiving SOLIDWORKS assembly files with toolbox references from users who do have a local toolbox.
Installing on the local machine
If you have installed the toolbox on the local machine, you need to make sure that you only have 1 SOLIDWORKS Data folder. We see that when people uninstall/reinstall SOLIDWORKS on their machines, they end up with multiple SOLIDWORKS Data Folders on their systems which can look like this image.

If this is the case, find which SOLIDWORKS Data folder you are currently using in SOLIDWORKS (tools–>options->system options->Hole Wizard/Toolbox) – Keep that one, and delete/archive the rest.
What should I do if I need to install multiple Toolboxes?
There are some cases where you may need multiple toolboxes on your system. One example is where you need to run multiple versions of SOLIDWORKS on the same machine (e.g. SOLIDWORKS 2011, SOLIDWORKS 2012, SOLIDWORKS 2013, etc.). Each version needs its own unique SOLIDWORKS Data folder. In this case we’d recommend giving each folder its own unique name. We tend to suffix the SOLIDWORKS data folder with the year version as per the image, but you can call the folder whatever you like.

What can happen if the Toolbox isn’t installed correctly?
A problem that can arise from having multiple toolboxes installed on the same machine is where SOLIDWORKS opens the toolbox files from. If it is not opening the toolbox file from the active toolbox folder (the one specified in tools->options->system options->Hole Wizard/Toolbox) and the configuration of toolbox file does not exist in that folder, then it will not automatically create the configuration and revert to the default (preview cfg) configuration. If you’ve ever opened up an assembly and seen that the toolbox files are unusually large – this is probably what has happened.
In SOLIDWORKS 2011 a new option was included in within the toolbox options to always your specified toolbox folder as the default search location for toolbox files. So if you open an assembly with toolbox references, it will force them to open from the toolbox file that you have specified in tools->options->system options->Hole Wizard/Toolbox. we’d always advise that you use this option.

Upgrading your Toolbox
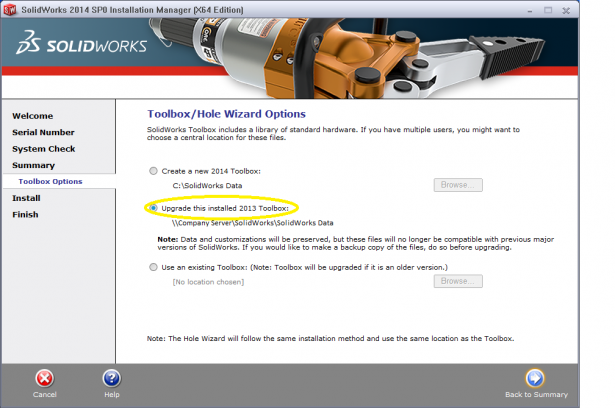
If you are upgrading to a new major version of SOLIDWORKS. You will be given the option to install a new toolbox or upgrade an existing toolbox. If you have done any customization of the toolbox you will need to choose to upgrade otherwise you will lose all customisation.

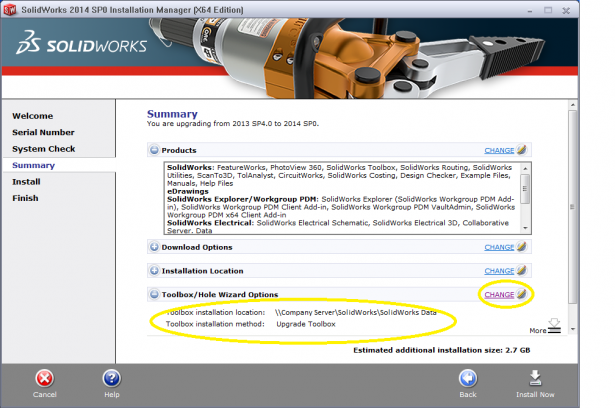
To get to this page, click change on the summary page next to Toolbox\Hole Wizard options. Once you have selected to upgrade the toolbox, click back to summary and the changes you have made will be shown as per the image.

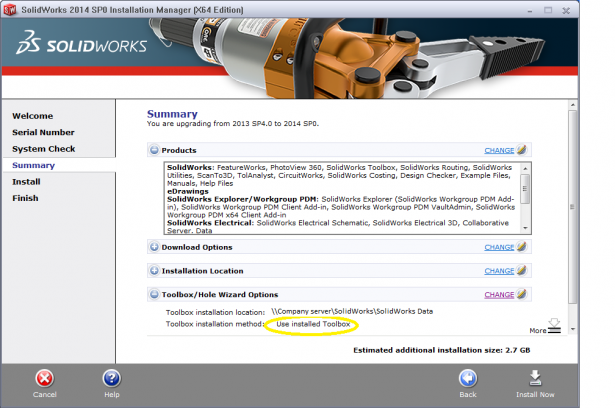
Once the toolbox has been upgraded on the server, when you upgrade all the other clients the installation manager will see that the toolbox on the server is at the correct version and will not try to upgrade it during the installation process. It will display ‘Use Installed Toolbox’ next to Toolbox installation method.

It is necessary to allow your first installation to finish upgrading the toolbox before you update all the other client machines.
If you follow the above procedures, you will find that you can successfully manage your toolbox.
– See more at: http://blogs.SOLIDWORKS.com/tech/2014/04/installing-the-toolbox-the-correct-way-2.html#sthash.qK7aQrLj.dpuf


