There are several things that can affect the display of a Cosmetic Thread in your SOLIDWORKS parts, assembly, or drawing, and each of them will display differently depending on the component, feature and even the environment you’re working in. This SOLIDWORKS tutorial will run you through all the possible causes and show you how to fix your Cosmetic Thread issue for good.
Edit the Hole and ensure the Cosmetic Thread is turned on
You first need to double check that the feature you’re using has the option for thread enabled. If this is a Hole Wizard, or similar feature, edit it and check that the Cosmetic Thread is enabled. It’s also a good idea to tick the With thread callout option to enable the notes in a drawing, as highlighted below.
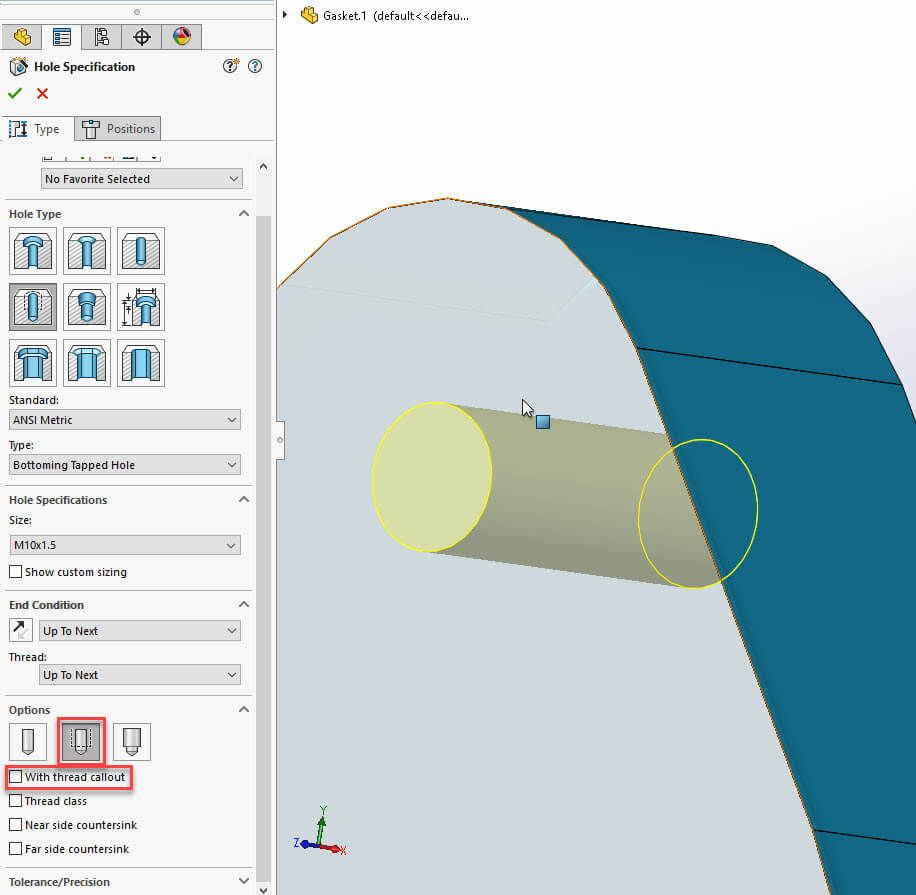
Once you’ve checked this, make sure that the feature isn’t suppressed in the Design Tree. You’ll need to expand the feature to see if the item is greyed out and suppressed. Right click on the item if you wish to Unsuppress it.

Check the Detailing page in the options
The next place to check is the options menu. Browse to the Tools menu, then Options>Document Properties>Detailing

On this screen the Cosmetic threads option will show the thread outline on our model. The Shaded cosmetic threads tick box will show the thread’s shaded appearance inside the hole.
Right Click on the Annotations folder
The same options as above can be accessed by right clicking the annotations folder in the design tree. There is a Details option which will appear on the right click menu.
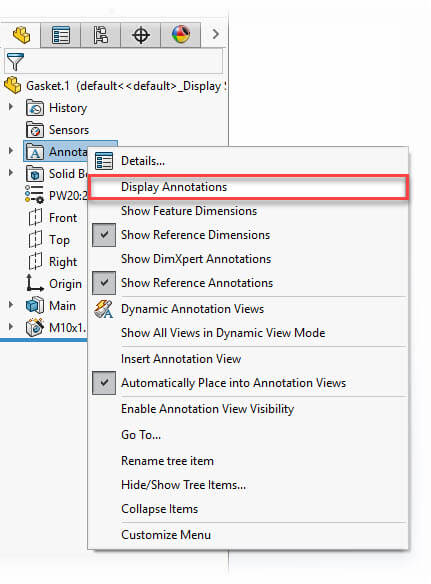
You’ll also need to select the Display Annotations option in the same right click menu. This will need to be checked on in order for any annotations to be shown.
These options exist in Part, Assembly and Drawing. This allows the visibility to be controlled in all environments.
Show all annotations on the View menu
For Parts and Assemblies you will need to make sure that the option to display All Annotations (Part) or display Top Level Annotations (Assembly) is turned on.
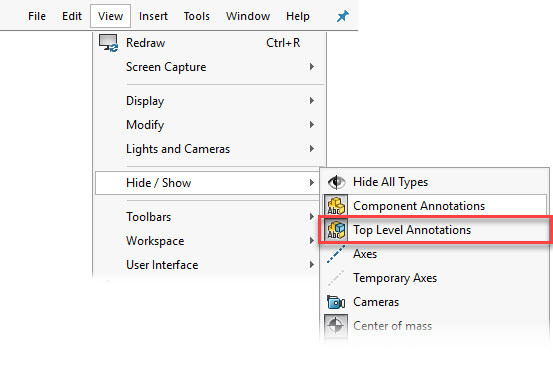
Model Items for Assembly drawings
If you’ve created a drawing of an assembly – and you’re in the Drawings environment – You’ll notice that Cosmetic Threads are hidden by default. To unhide them you must use the Model Items command to import them from the assembly.
This Command can be found on the Annotations tab in a drawing. Once activated there is an option for Cosmetic Threads, which is found under the Annotations section. From here you have 2 options:
- Set Source/Destination to selected feature and select the hole feature
- Alternatively set Source/Destination to entire model and click on one of the drawing views.
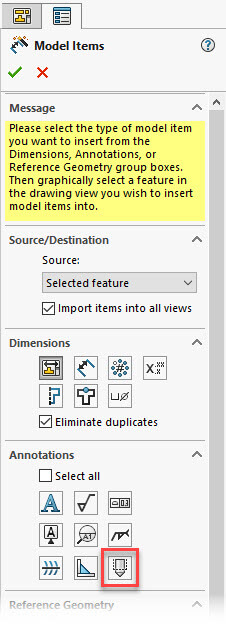
Once complete hit the green tick.
Set your Cosmetic Threads to High quality
SOLIDWORKS allows you to specify the quality of threads displayed in a given view. To find this option, select a view and scroll down in the property manager on the left. at the bottom of the panel you will find the option to set your Cosmetic Thread Display to High, or Draft quality.

High Quality Cosmetic Thread Displays precise line fonts and trimming of threads. Essentially, it will only show the visible portion of the cosmetic thread. However, please be aware that this can sometimes slightly decrease the performance of your software when working on the drawing.
Make sure the Cosmetic Thread displays in drawing view
Sometimes a cosmetic thread can be shown in one drawing view, but not another. In this case the cosmetic thread may be hidden in the design tree.
To correct this problem, you’ll need to find the view which isn’t showing the cosmetic thread correctly.
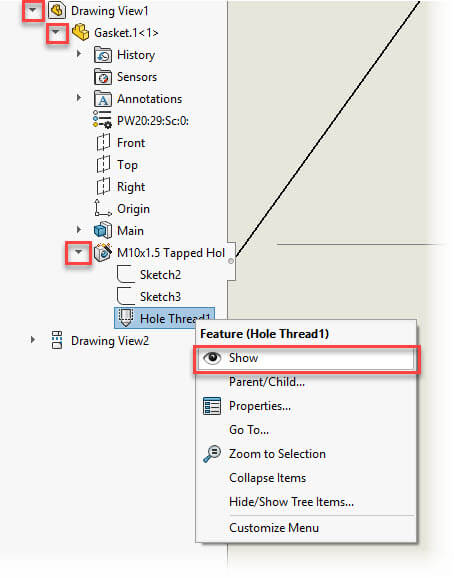
Navigate down into this view, expanding items until you find the hole in question. You should see the Hole Thread, if you right click this item you should be able to Show the thread if it is hidden in the drawing.
Your Cosmetic Thread issue should now be fixed!
If your Cosmetic Thread issue is more specific than the solutions described here, we recommend contacting your SOLIDWORKS Reseller for assistance. If you’re a customer of Innova Systems with an active SOLIDWORKS Subscription, get in touch with our award winning support team now and we will be more than happy to help!
We hope you found that useful!
Have you seen our blog archive where we have posted plenty of helpful articles? We also have a fantastic video library filled with easy-to-follow videos on a number of topics inspired by other SOLIDWORKS users – take a look. Also, don’t forget to follow Innova Systems on Twitter for daily bite size SOLIDWORKS tips, tricks and videos.


